Get in the hole Why is putting so difficult?
In last month’s blog, we talked about how you can identify different green speeds and how various factors influence the speed of a green. But as all golfers know, there is more to the secret of putting than simply knowing the green speed. You still have to manage to match the speed of your putt to the green speed. And, on top of that, you also need to know how much the putting speed affects the amount of break you need to account for in order for the ball to go into the hole. At first, this sounds utterly complicated, but the good news is, you can learn and practice to get better at it. And we will tell you how.
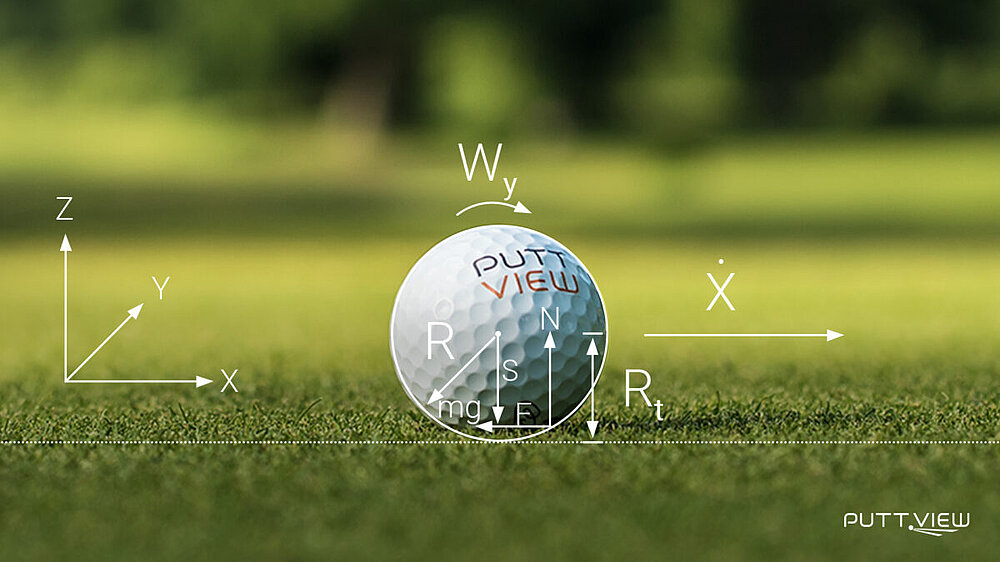
Every time an object is moved in a specific direction, physics is involved. While a lot of people do not have the fondest memories when thinking about their last physics lessons, this is actually good news. Why? Because it means you can calculate exactly what your ball will do under specific circumstances. It means that putting can be its own science and there is absolutely no myth about it. At this point, we could also provide you with a specific formula. So why is it, that putting still involves so much guessing and even the pros who have mapped out green books are still missing putts? The most obvious answer is that we are still talking about the real world and humans.
First of all, there are a lot of unknown variables. If you try to apply the formula on any given green you are standing on, it will inevitably lead you to a margin of error because you won’t be able to know all the necessary numbers to make a precise prediction. Next, you are probably not a huge math nerd and for you to calculate everything in your head would probably lead to a headache and long strenuous rounds for the groups playing behind you. Lastly, you can’t feel, see, touch, or smell speed. Your brain has no reference point when it comes to speed and cannot rely on your senses. You might know you are moving in a specific direction or if you apply more or less force to the ball, but you can’t rely on your body to measure the exact amount of speed or force that is applied. This is exactly the reason why we struggle so much with putting speed and distance control. But before we dive deeper into this issue and how you can resolve it, let’s talk about the things we can measure first.
Effective Hole size – increase your chances of holing out!
.
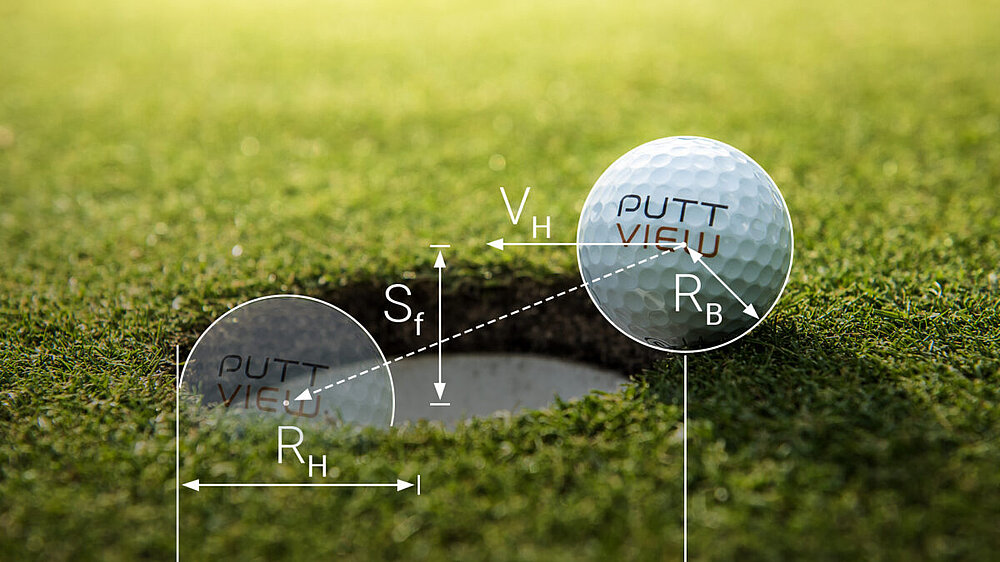
The size of the hole is the same all over the world. It measures approximately 10.8 cm or 4 1/4 inches and has been doing so since 1891. While the actual size of the hole does not change, the effective hole size varies depending on the speed the ball is traveling.
In case you believe the best thing to do, is never to leave a putt short, keep in mind, that by increasing the speed of your putt, you also increase your chances of a lip out. The reason for that is the so-called free-fall-condition. This condition needs to be met, in order for the ball to stay in the hole and it is met, once gravity takes over. A slow traveling ball will therefore be more likely to fall into the hole, than a fast traveling ball. Of course, there are more factors, such as off-center hits, that have an impact on the formula, but for this context, it is enough for you to know that once the condition is met, the ball will inevitably fall into the hole.
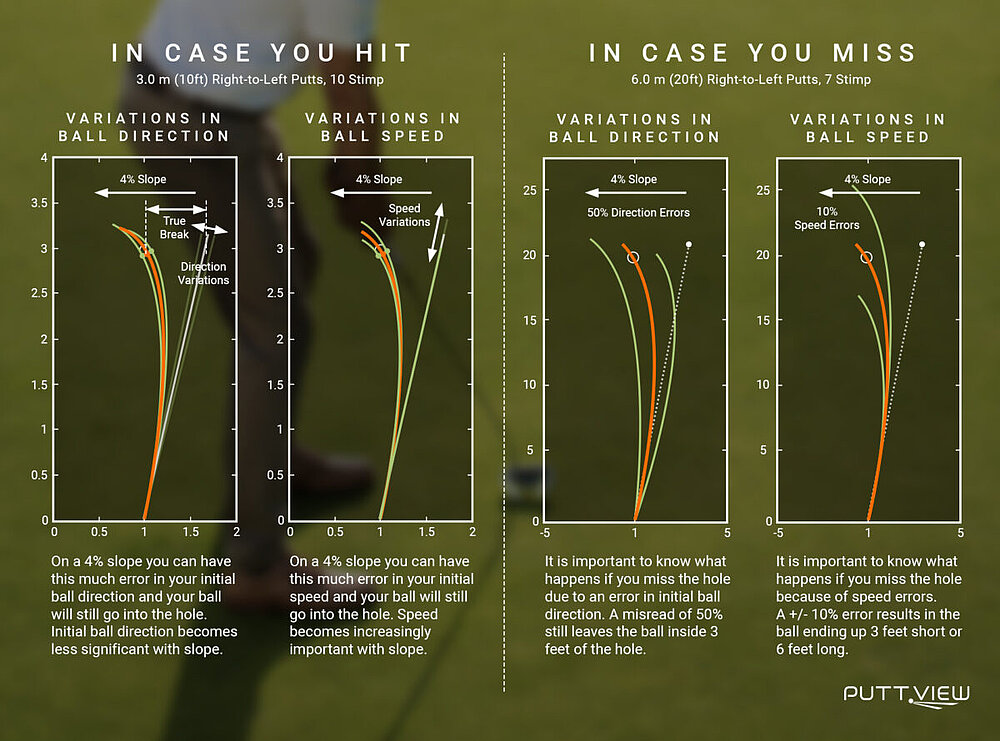
The question you will have to ask yourself is when is the effective hole size biggest? And what happens, if you miss the hole? If you look at a 4 % sloping green like in the graphic shown below, you will learn the following:
Listen to your coaches that have been telling you all along to never miss a putt on the low side and a short putt will have a 0% chance of going in. But there is more to it. But let’s talk about why.
By looking on the right side of the graphic above, you can see which lines you can putt on a 10ft, 4% slope, and 10 stimpmeter green and still make the putt. As you can see, there is quite some room for error that you can have on both sides of the ideal line. On top of that, no matter which line your ball ends up traveling on, if you manage to get the exact same speed every time, then your ball will end up inside 3 ft in case you missed the putt. This is very important information as from a distance of 10ft, more often than not, amateurs miss the putt. So when making a decision about your putt, you should always consider where your ball will be if you miss the putt. Or in other words, how far can you afford to be away from the hole to feel comfortable on your putt coming back.
On the other hand, if you look at the second picture, you can see the speed errors you are allowed to make and your ball will still go into the hole. You can immediately tell, that the room for error is significantly less than what you had with the initial ball direction. This becomes even more evident if you look at the two pictures on the right side of the graphic. Here you can see the results of missed putts. Again, you can see, that having the right speed, but being slightly off-line, produces a far less significant error, than if you hit the ball on the right line and vary in speed. Especially, if you think back about what we have established earlier on the effective hole size. A fast putt, will not only make the hole smaller for you, but a mistake will also result in a long putt coming back. But what should you do with this information?
Think about it rationally. If we combined what we just learned, you know, that if your ball is traveling on a rather low line, you would have to get the speed exactly right in order for the ball to still fall into the hole. However, if you overread a putt, you could still have some speed errors and your ball might end up in the hole anyways. Therefore, it is always better to aim higher, rather than lower, especially since most amateurs tend to under-read putts anyways.
But what about the speed?
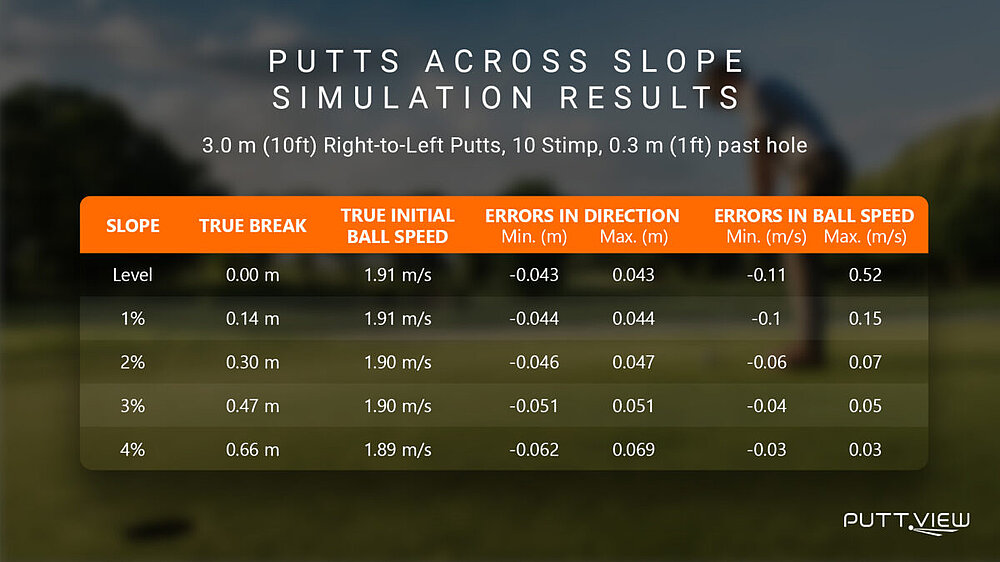
While break increases on the green, your margin of error in your initial ball direction increases too. In other words, the more slope you have, the more you can be off on your initial ball direction.
In terms of putting speed errors, it is a totally different story and quite the opposite is seen in the data. As seen in the graphic below for a level putt you can misjudge the speed by -0.11 m/s and up to 0.52 m/s and your ball would still fall into the hole. However, if you are on a 4% slope, you are only left with a margin between -0.03 m/s and 0.03 m/s. This is an incredibly low number, and it explains why break putts are so difficult. You have almost no margin of error when it comes to speed, the more slope you add. Making mistakes much more likely.
You might ask yourself now, how on earth you should ever be able to judge speed on a green this precisely. And the answer is that there is no one way to do it, but we will get back to this later.
The same holds true in terms of perfect putting speed. You probably heard a coach or fellow player say something along the lines of ‘the perfect putt stops one foot behind the hole’ before. But again, there is no perfect putting speed and this is something highly individual. Of course, for that speed, the effective hole size is statistically speaking the biggest, but what happens if this leads you to leave your putts rather short all of the time? Or, if you think to yourself I have to be more aggressive and get the ball to the hole, but end up with those dreaded 3-5 footers coming back and missing them as well? Not to mention uphill or downhill putts, where you might not want to be that far past the hole and proximity is more of a focus to you, rather than holing out the putt.
You don’t believe that this might be an issue for you? Try going to a putting green and find a breaking putt. Then go ahead and putt with different speeds, yet always holing out. You will inevitably notice what feels comfortable for you and what does not.
This is vital because if you go against your own feelings on the green, then chances are that the results will not be as desired and this is exactly the reason why there is no such thing as a perfect putting speed. Also, keep in mind, if you do not feel comfortable with holing out two or three-footers for par, your score will suffer as well. You see, there are a couple of factors to be considered while picking the perfect speed for you. The only rule of thumb that you want to consider while approaching your putt is, that it is better to overread a putt and hit it firm than the other way around.
Now, let’s have a look at how you can improve your speed control. The problem with practicing your putting speed control on a regular green is, that you do not know if you made an error on your initial ball direction or if it is a matter of speed control. At least not, without any additional tools and even then, it is a lot of guessing and trial and error scenarios. But you can still work on improving your speed control. So, if you do not own a PuttView System, which will definitely take away any guessing, you will need tees (coins) and a string to simulate the following drill.
As mentioned above, a lot of golfers have trouble visualizing a breaking putt in their minds, not to speak of imagining different lines for different speeds. Take a look at the picture below, to see how drastically the line can change, depending on the speed of your putt.
Now, that you got a feeling for different lines depending on your putting speed, go onto the putting green and choose a breaking putt. You should decide on your intended starting line and place a gate made of tees a couple of inches in front of your ball. This will be your intended starting line. On your PuttView System, you can simply activate the Ideal Line or, if you are a straight-line-thinker, the Aiming Line feature on the tablet. Your PuttView System is by default set to one foot past the hole.
On a regular green, you can continue by placing another tee either where you believe the apex of your putt should be, or next to the hole to represent the aiming line. In case you want to see an actual line, you can place a tee behind your ball and attach a string from this tee to the tee that represents your aiming line. Important: Do not do the same with the apex point because that line is not supposed to be a straight line. You might need a couple of putts to adjust your setup to the correct spots.

Now proceed to hit a couple of putts and also pay close attention to what happens if you miss the hole and how far your ball ends up behind or in front of the cup. This is especially important if you do not have a PuttView because you do not know at what speed you calibrated the putt beforehand and if you missed due to a speed error or a miss read. With PuttView you know the exact speed of the simulated putt and you can solely rely on your feeling and if the speed feels comfortable to you.
Once you made a couple of putts, you can continue by changing your initial direction. On a regular green adjust the tees and your aiming points (apex and/or aiming line) so they fit for a putt with more speed. This means you need to account for less break on the green than you had in your previous putt. On PuttView you can simply go to the settings and adjust the speed of your putt to two feet past. The Ideal Line and Aiming Line will be recalibrated instantly. You will notice the difference in speed and after a couple of putts, you are able to tell whether this fits your speed tendencies better than on the last putt, or not.
Continue with various other speeds and try to figure out, which putting speed fits best for you and at the same time leaves you with a putt that you can easily make in case you happen to miss the hole. Once you have determined that, you can also add various distances to that drill. Please keep in mind, that on a regular green there is always the chance for human errors and your findings are not as easy to replicate, especially if you change the distance of your putt or hole locations. For starters, you should also make sure to practice your speed control on the same green and, if possible, under the same conditions.
The reason being that it takes time for your brain and hand-eye coordination to form a connection to your intended speed and it will do more harm than add benefit if you switch to various green speeds too fast. The same counts for PuttView users, however, the learning curve is more efficient because you have visual cues to help your brain form connections and to support intuitive learning. Furthermore, you can guarantee the exact same conditions on every putt you hit on a PuttView green.
Speed control will always be something that is difficult for humans. As mentioned above, your brain has no reference points to help it measure speed, and therefore, you can only try to make things repetitive. Just like you can learn to hit a quarter shot to the green, you can learn to control your putting speed over time. And just like said shot, attaining your goal of holing out more putts is highly individual.
The biggest mistake amateurs make is to try and putt as close as possible to the hole. This mindset is predestined to cause a short putt out of fear the ball will end up too far away from the hole. Ultimately, however, this leads to worse outcomes than if you simply rely on facts and therefore increase your chance of not only holing out more often but also minimizing your three-putt percentage.
Next time you are on the green or your PuttView, try the drill mentioned above, and on your next round, if you are scared to overread a putt or to hit it a little too far, simply think about those numbers and make a good and confident stroke. Because like it or not, numbers don’t lie.
Stay in the loop
Join our mailing list for latest news & promotions. You can unsubscribe at any time, for more information view our Privacy Policy.
